
Tying a tie is a skill that every well-dressed individual should possess. Whether you're preparing for a job interview, a formal event, or simply aiming to elevate your everyday attire, knowing how to tie a tie properly adds a touch of sophistication and completes your look. While it may seem daunting at first, with a little practice and the right guidance, you'll be able to tie a perfect knot effortlessly. In this article, we will walk you through the step-by-step process of tying a tie, providing you with the knowledge you need to become a tie-tying pro.

Step 1: Preparation
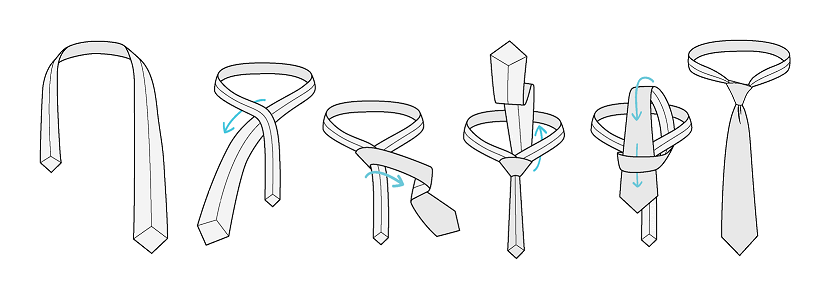
Before you begin, ensure that your shirt collar is up and the top button is fastened. Flip the collar up and drape the tie around your neck with the wide end hanging on your dominant side and the narrow end on the opposite side. Make sure the wide end is longer than the narrow end.
Step 2: Cross and Tuck
Take the wide end of the tie and cross it over the narrow end, forming an "X" at the collar. The wide end should now be on the opposite side. Then, take the wide end and bring it up and through the back of the "X" near your neck. Pull it through, creating a loop.
Step 3: Loop and Tuck
Hold the bottom of the loop you created in Step 2 with your non-dominant hand, while using your dominant hand to bring the wide end of the tie down through the front of the loop you just made. Keep holding the bottom of the loop as you gently tighten the knot by pulling the wide end downwards. This will form the base of your tie knot.
Step 4: Final Touches
To complete the knot, take the wide end of the tie and cross it over the front of the knot from right to left. Then, bring the wide end up and through the loop around your neck, forming a second loop. Adjust the tightness and alignment of the knot by holding the knot with one hand and sliding it up or down the narrow end of the tie with the other hand.
Step 5: Finishing Up
Once you're satisfied with the tightness and positioning of the knot, neatly tuck the wide end of the tie through the loop on the backside of the knot. Make sure the tip of the wide end is hidden and the tie lies flat against your shirt collar.
Extra Tips:
- Practice makes perfect: Don't be discouraged if you don't get it right on the first try. Tying a tie requires practice, and with time, you'll become more adept at it.
- Experiment with different knots: There are various types of knots you can try, such as the classic Windsor knot, the smaller Four-in-Hand knot, or the sleek and symmetrical Pratt knot. Explore different knot styles to find the one that suits your preference and the occasion.
- Pay attention to length: The tip of the tie should ideally fall around the middle of your belt buckle. Adjust the length by altering the position of the knot or by adjusting the initial placement of the wide end.
Conclusion:
Mastering the art of tying a tie may seem challenging at first, but with patience and practice, it becomes second nature. A well-tied tie not only enhances your appearance but also exudes confidence and professionalism. By following the step-by-step instructions and taking note of the tips provided in this article, you'll be well on your way to tying impeccable knots and adding that perfect finishing touch to your attire. So, go ahead, grab a tie, and start practicing. You'll soon be tying knots with finesse and flair!